Approvals in Microsoft Teams
- Amanda Sterner

- Jan 15, 2021
- 4 min read
Updated: May 2, 2022
Something I’ve been looking forward to is approvals in Microsoft Teams! Instead of sending an email or chat/channel message asking for an approval, that gets lost in all the noise, Microsoft have now released a new easy way of approving things. In this blog post I’ll have a look at the new way of approving in Microsoft Teams.
Search for Approvals and let’s dive into the app.

What is the purpose with Approvals?
The purpose of Approvals is simple – quote Microsoft:
“Enables everyone, from frontline workers to corporate headquarters employees, to easily create, manage, and share approvals directly from your hub for teamwork”
Sounds like a great addition to Microsoft Teams to me 😊.
What can you do with Approvals?
It all starts with the new Approvals app, once this is available for you in your tenant it should be installed automatically. Otherwise you can try searching for it in the store and install it.

First let us clarify what you’ll see.
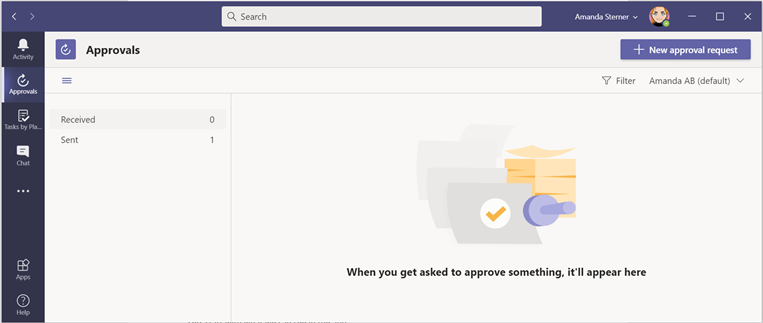
Received/sent
Here you will see all approval request you’ve received/sent. Per request you can see request title, status, created date, requested by who and who received the request (this is probably more interesting if the request is sent to more people). I’ve understood that if you’ve created approvals in Power Automate before with the approvals connectors these will also be visible here (and apparently there’s no way to delete one – so this view might be cramped after some time 🤷🏻♀️).

If you click an item, you’ll see more details.

New approval request

You can create a new approval request from the app, but also from a team or chat. The components are the same regardless from where the approval is created. We have:
Name of request – This the name of the request, make it clear for the user, so they understand what to do 😉.
Approvers – This is where you add the approvers for the approval, it can be more than one person. If you added several people, there’s a radio button which decides if all approves need to approve or if it’s enough with one approval.

Additional details – If the request needs lots of information that does not fit in the name this is the place for that. If there’s a file you want the person to approve, I would recommend adding the link here (at least if it’s in a team) since all attached files goes to a new folder in your OneDrive called Approvals Documents.
Attachment – If you want to attach a file, as said above all files attached here end up in a new folder called Approvals Documents in your OneDrive.
Custom responses – The standard responses are Cancel request, reject, and approve. If you for some reason want to add different options (maybe if the answer is A or B rather than yes or no) you can add two custom options that replaces the standard ones. But since it’s harder to understand if the answer are yes/no those approvals statuses will be colour coded as yellow.

Filter
In the filter you can filter between only showing open approval request, and approvals with a custom response.

Your default environment
From what I’ve tested and understood approvals is built upon the Power Platform. This means everything is saved in the old CDS (hey Dataverse), the different Dataverse for Teams environment I’ve added in my tenant shows up but there is nothing I can do at the moment. I only seem to be able to add approval request to my default organization environment. To be continued…

What about in a team or chat?
To create a new approval request in a team or a chat you need to localize the approval icon in the chat, it looks like a checkmark and an arrow.

Clicking this in a chat or channel conversation will open the exact same dialogue as in the Approvals app, something I thought would be nice is for the correct person the to pre-added if you open this from a chat. But that does not work as of now.
Approve or reject?
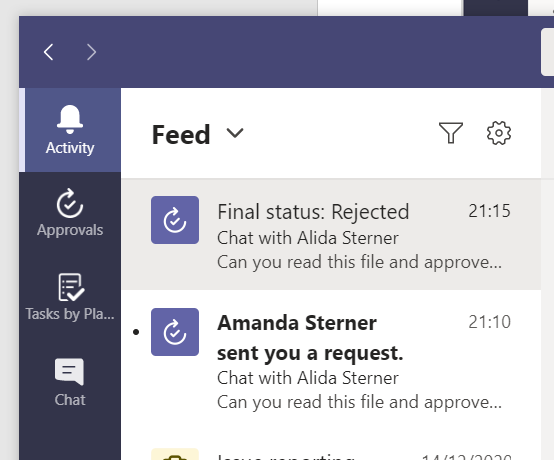
Ok we created a new approval request, how does it look on the other side? The standard setting is that you’ll get an notification when there’s a new approval for you (so no need to look in the app daily to make sure nothing is missed).

If you click the request it will be opened where it was created, in a chat/conversation you need to click view details to open the form where you can approve/reject (this means you also can find the request from a chat/conversation). If it was created in the app, the form will open directly without any extra clicks. You can of course also browse in the app in the request lists.

When the request is open you will see all the added details, and when you are ready it’s time to approve or reject. A nice thing is that you can add a comment to make it easier for the sender to understand your answer.

When the request is ready (whether it be approved, rejected, or cancelled) you’ll get a notification and hopefully a comments that makes everything clear 😉.


My grade
The biggest concern I have with Approvals so far is the lack of functionality for attaching files, I really don’t like that the file is stored in a new folder in my OneDrive, the file should really be attached from the original source. But as a workaround you could add the link (make sure the permissions are correct before then 😊). I’m also missing some sort of connection to a team, would be nice to be able to sort on all approval request connected to a specific team, not a blocker but would be nice.
When I get a little bit comfier it will be exciting to test to create flows and make this even smarter. Imagining automating requesting a new computer or a mobile (you just add the details, and your manager approves or declines).
And as I say something, the only way is up and now we can just wait for added rich functionality! Microsoft already announced electronic signatures.
✨✨✨


A very interesting article. Thanks for sharing it. For me CBD is a good opportunity to feel better and relax. I use this all the time and have found that CBD gummies are the perfect opportunity to relieve pain and feel better. It's really a good solution for relaxing and you don't have to have any problems.
How do you get the date and time stamp of the approval to show like that? I only see "45 min ago" in my approval list.
The attachment feature is confusing also because it indicates multiple attachments but, so far in my experience, only one attachment can be added.